Hey there, car enthusiasts and DIY mechanics! If you're in the process of replacing a car starter, you've come to the right place. As a supplier of car starter replacements, I've seen it all when it comes to getting the job done right. One of the most crucial steps that often gets overlooked is securing the new car starter properly. In this blog, I'll walk you through the ins and outs of ensuring your new starter is securely in place, so you can get back on the road with confidence.
Why Proper Securing Matters
First off, let's talk about why it's so important to secure your new car starter correctly. A loose starter can lead to all sorts of problems. It might not engage properly, causing your car to have trouble starting. You could also experience excessive vibrations, which can damage the starter itself or other components in the engine bay over time. And in the worst-case scenario, a poorly secured starter could even come loose while you're driving, which is not only dangerous but also leaves you stranded.
Preparing for the Replacement
Before you even start thinking about securing the new starter, you need to make sure you've got everything in order. First, gather all the tools you'll need. You'll typically need a socket set, wrenches, and maybe a pry bar. It's also a good idea to have some penetrating oil on hand in case any of the bolts are rusted or stubborn.


Next, disconnect the battery. This is a crucial safety step. You don't want any electrical current flowing while you're working on the starter. Just remove the negative terminal first, then the positive. This helps prevent any accidental short circuits.
Removing the Old Starter
Once you're all set up, it's time to remove the old starter. Locate the starter in your engine bay. It's usually near the bottom of the engine, close to the transmission. You'll see a couple of bolts holding it in place, as well as some electrical connections.
Start by removing the electrical connections. There's usually a large battery cable and a smaller control wire. Make sure you remember which wire goes where, or take a picture with your phone to be safe. Then, use your socket set or wrenches to remove the bolts holding the starter to the engine. It might take a little wiggling and prying to get the old starter out, but be careful not to damage any surrounding components.
Installing the New Starter
Now that the old starter is out, it's time to install the new one. Before you do, take a good look at the new starter and make sure it matches the old one in terms of size, shape, and electrical connections. If it doesn't, you might have the wrong part.
Carefully position the new starter in place. Line up the bolt holes and insert the bolts, but don't tighten them all the way just yet. You want to make sure the starter is properly aligned before you fully secure it.
Securing the Starter
This is the part we've been waiting for. Once the starter is in position, start tightening the bolts. But don't go crazy with the torque. You want to tighten them to the manufacturer's specifications. If you don't have the specs handy, you can usually find them in your car's service manual or online.
A good rule of thumb is to start by tightening the bolts in a crisscross pattern. This helps ensure even pressure and prevents the starter from warping. Tighten the bolts gradually, checking the alignment as you go. You should be able to feel when the bolts are snug, but not overly tight.
Checking the Electrical Connections
After the starter is securely bolted in place, it's time to reconnect the electrical connections. Make sure the battery cable is tightened down properly. You can use a torque wrench to ensure it's tightened to the correct specification. The control wire should also be securely attached.
Once everything is connected, double-check all the connections to make sure they're tight and there are no loose wires or exposed terminals. This is important for both the proper functioning of the starter and your safety.
Testing the Starter
Before you put everything back together and close up the engine bay, it's a good idea to test the starter. Reconnect the battery, making sure to connect the positive terminal first, then the negative.
Turn the key in the ignition. If the starter engages smoothly and your car starts up without any issues, then you've done a great job. If you hear any strange noises or the starter doesn't engage, stop immediately and double-check your work. It could be something as simple as a loose connection or a misaligned starter.
Using Quality Parts
When it comes to replacing your car starter, using quality parts is essential. At our supply, we offer a wide range of high-quality starters, including the Ford Starter Bendix and the Dometic 310423209B Drive ASM. These parts are designed to fit your car perfectly and provide reliable performance.
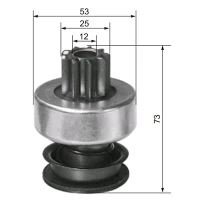
We also have a great selection of Car Starter Bendix options. These are important components that help the starter engage with the flywheel, and having a quality Bendix can make a big difference in how well your starter works.
Conclusion and Call to Action
Securing a new car starter properly during replacement is a crucial step that shouldn't be overlooked. By following the steps outlined in this blog, you can ensure that your new starter is installed correctly and will provide reliable performance for years to come.
If you're in the market for a new car starter or any related parts, we're here to help. We've got a wide range of products to suit all makes and models, and our team of experts is always available to answer any questions you might have. Whether you're a professional mechanic or a DIY enthusiast, we've got the parts and knowledge you need to get the job done right. So don't hesitate to reach out and start a conversation about your car starter needs.
References
- General automotive repair knowledge and experience.
- Various car service manuals.